
Core capabilities of 3D printing
What you can make with a home 3D printer
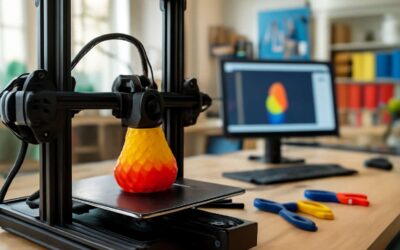
Across homes reshaping makerspaces, 3d printing what can you make isn’t a mystery—it’s a working philosophy. Projects move from idea to object in days, not weeks, when a home printer stands beside you. Core capabilities—rapid prototyping, customization, and material flexibility—let you test form and function before committing to anything mass-produced.
So, what can you make at home? The answer spans everyday fixes and personal touches.
- A durable phone stand tailored to your desk
- Replacement cabinet pulls that match your decor
- Cable clips and organizers for tidy setups
- Custom gasket spacers or seals for equipment
- Tiny models, teaching aids, or game pieces
Among South Africa’s maker spaces, the spirit of self-reliance grows as neighbours swap designs online and tailor them to local needs.
Overview of popular applications across industries
In a world where speed matters, 3d printing what can you make isn’t a mystery—it’s a philosophy. Adoption has climbed 25% year on year, and South Africa’s makers ride that wave. Core capabilities—rapid prototyping, customization, and material flexibility—let you iterate form and function in days, not weeks. It’s the Swiss Army knife of the workshop, turning ideas into tangible results before coffee goes cold.
Across industries, 3d printing spans healthcare, manufacturing, and education, delivering fast, customized solutions with less waste. In South Africa, hospitals print anatomical models for planning surgeries, and universities use teaching aids to bring theory to life.
- Healthcare: anatomical models, tools, prosthetics
- Engineering: jigs, fixtures, spare parts
- Education: teaching aids, prototypes
In local maker spaces, designs circulate online and are tailored to our conditions—South African ingenuity on display. A single printer can flip from hobby to industry, right on your desk.
Creative and practical use cases for learners and hobbyists
Core capabilities drive everything you can do with a desktop printer: rapid prototyping that compresses weeks into days, customization that fits exact needs, and material flexibility that spans polymers to tougher composites. In South Africa’s vibrant maker spaces and classrooms, adoption has climbed 25% year on year, turning ideas into tangible objects while coffee cools on the edge of your desk.
3d printing what can you make becomes a practical question for learners and hobbyists. The answer arrives as editable models, modular parts, and printable tools that broaden experimentation and design thinking.
- classroom science demos you can print and manipulate
- modular tools and organizers for the home workshop
- cosplay props and tabletop game miniatures
Limitations and considerations when planning builds
Core capabilities steer every desktop project, turning rough ideas into tangible tests. Rapid prototyping compresses timelines from weeks to days, letting designs evolve with curiosity. Customization follows, shaping parts that fit exact ergonomics and constraints. Material flexibility spans polymers to reinforced composites, opening doors to durable jigs, precise scaffolds, and prototypes. In South Africa’s maker spaces and classrooms, these capabilities translate into objects that mingle function with meaning.
Limitations and considerations emerge where physics takes the stage:
- Build volume may cap ambitious designs
- Material properties and anisotropy affect strength
- Post-processing requirements shape finish
Planning adds nuance: tolerance and fit shape the final object. Framing goals with constraints reveals 3d printing what can you make as the outcome of thoughtful planning, where design intent meets material truth in South Africa’s classrooms and studios.
Beginner to intermediate project ideas
Small functional parts and tools for daily life
Step into a sunlit workshop where light dances on plastic and possibility. 3d printing what can you make opens a doorway to tiny miracles in daily life. Across South Africa—from Cape Town’s coastline studios to Johannesburg’s buzzing study corners—beginners and intermediate makers sketch models that clear clutter and add quiet elegance to everyday chores.
- Phone stand with a comfortable viewing angle for desks and counters
- Cable organizer clips to tame cables and chargers
- Measuring spoons with precise metric markings
- Wall hooks or small brackets tailored to your space
These small, practical prints slip into kitchens, desks, and toolboxes, growing with your needs rather than demanding a full renovation. They feel like friendly sprites from a workshop—subtle, useful, and ready to surprise you with what 3d printing can do.
Desk organizers, cable management and accessories
In South Africa, the morning light spills across a sunlit desk and clutter yields to calm. A maker from Cape Town once told me that the right small print changes your day before the first coffee. 3d printing what can you make? becomes a friendly question with practical, tangible answers—beginner to intermediate ideas that fit daily life. Desk organizers, cable management and accessories slip into kitchens, study corners, and toolboxes without demanding a full renovation.
Consider starting with objects that blend form and function:
- Modular desk trays for papers and notes
- Flexible cable clips that nest along the monitor edge
- Compact pen holders with integrated phone stand
These prints honor small spaces—Johannesburg study corners, coastal flats, and rural workshops. They invite iteration: tweak thickness, test fit, swap colors to match a mood. The result is a tactile desk ecosystem built by hands that know daily life’s creases—and a reminder that small, well-made parts can lift a whole room.
Replacement parts and upcycling common items
In South Africa, morning sun spills across a desk and melts clutter faster than a cappuccino foam. A recent survey hints 63% of households would rather print a replacement part than chase it at town. As I juggle tiny parts and bigger ideas, 3d printing what can you make becomes a friendly question with practical, tangible answers—perfect for beginners and those itching to tinker on a budget.
Beginner to intermediate ideas centered on replacement parts and upcycling common items:
- Replacement knobs and handles for kitchen drawers
- Cable clips and organizers that nest along monitor edges
- Custom labels and tag rails repurposed from everyday bits
These prints flourish in small spaces—Johannesburg studios, coastal flats, and rural workshops—where tiny parts make a grand difference. Iterate by tweaking wall thickness, testing fits, and swapping filament colors to match your mood.
Miniature models, cosplay props and toys
In sunlit South Africa, the workshop hums and possibilities bloom. 3d printing what can you make becomes a lantern for curious hands, guiding beginners toward miniature realms and intermediate souls toward cosplay grit. A recent survey hints 63% of households would rather print a replacement part than chase it at town—proof that imagination travels fast in the dim-lit hours of a studio.
- Miniature models for tabletop sagas—tiny knights, dragons and wind-blasted ships
- Cosplay props—crest-emblazoned shields, gauntlets and stylized prop blades with clean lines
- Toys and collectibles—poseable action figures with detachable accessories
These quests flourish in the quiet corners of Joburg apartments, coastal flats, and rural workshops where a single printed piece can illuminate a shelf. The mood shifts with filament colors, turning ordinary plastic into living drama.
Home improvement projects and simple fixtures
South Africa’s makerspace pulse is tangible: 3d printing what can you make becomes a doorway to fix-it creativity. In homes from Joburg flats to coastal towns, budgets tighten and imagination sharpens. Beginners start with simple fixtures—drill guides and cable clips—while intermediate makers push toward sturdier brackets and clever mounting solutions.
Here are starter ideas to spark action, especially for enthusiasts stepping up from beginner projects:
- custom shelf brackets
- universal drill guides
- cable management clips
In SA, using PLA for ease or PETG for durability, these parts feel tangible and fast—proof that 3d printing is as much about mindset as material.
Materials, printers, and techniques
Overview of filament, resin, and powder materials
From the hum of a printer to the gleam of a finished part, 3d printing what can you make becomes a compass for the curious and the bold. In South Africa’s studios and workshops, filament threads and cured resins translate ideas into tangible objects, shaping everyday dreams into form.
Materials fall into three families: filament, resin, and powder. Filament fuels FDM with PLA, PETG, and nylon; resin powers SLA with standard, tough, and flexible mixes; powder supports SLS and metal-print possibilities.
- Filament: PLA, PETG, ABS
- Resin: standard, tough, flexible
- Powder: metal, ceramic, glass
Printers and techniques balance craft and capability. FDM handles everyday prototypes, SLA reveals crisp details, and SLS lends robust parts from the powder bed. Post-process finishing—sanding, curing, and a touch of paint—brings life to both practical and poetic forms.
Choosing between FDM, SLA, and SLS printers
In South Africa’s studios, ideas rise with the hum of machines. 3d printing what can you make becomes a compass for the curious and bold. A SA makerspace survey recorded a 38% jump in rapid prototyping last year, hinting at a future where imagination meets durable form!
Materials fall into three families: filament for FDM, resin for SLA, and powder for SLS. For easy reference, consider this quick guide:
- FDM: filament options—PLA, PETG, nylon; fast, affordable prototypes
- SLA: resin choices—standard, tough, flexible; high-detail works
- SLS: powder beds—metal, ceramic, glass; durable, functional parts
Printers and techniques balance craft and capability. FDM handles everyday prototypes, SLA reveals crisp details, and SLS lends robust parts from the powder bed. Post-processing—sanding, curing, and a splash of paint—brings life to both practical and poetic forms.
Slicing software basics and print settings
Materials in 3D printing sit on a spectrum: durable thermoplastics for daily parts, clear photopolymers for high detail, and engineered powders for rugged, functional builds. In South Africa, the right mix speeds prototyping and reduces waste, turning ideas into tangible tools, fixtures, and steady, repeatable components.
Printers map material to job, and technique brings the idea to life. FDM for quick proofs, SLA for crisp edges, SLS for robust parts. Slicing software becomes the translator, turning CAD into layers, perimeters, and supports so every feature lands true.
- Layer height and surface finish
- Infill density and pattern
- Supports and build orientation
- Print speed vs cooling
Print settings lock the performance. Start with sensible layer height, calibrated temperatures, and balanced infill. Tuning cooling, retraction, and minimising vibrations matters. “3d printing what can you make” thrives when the slicer controls the path from design to durable form.
Post-processing, finishing, and color options
Finish is part of the function, a truth echoed in South Africa’s design studios. 3d printing what can you make expands when you marry material choices with a thoughtful finish, from glossy photopolymers to rugged thermoplastics that weather wear and color with confidence.
Your printer’s capabilities—the surface texture it can achieve, the color options it supports, and how it handles post-processing—shape the final result. Post-processing and color options bring depth to builds:
- Smoothing, priming, and painting for displays and enclosures
- Clear coats and UV protection for outdoor use
- Metallic finishes, plating, and vivid resins for realism
- Colored powders and dyes for SLS or resin parts
When finish aligns with function, 3d printing what can you make becomes a tangible range of tools, fixtures, and keepsakes.
Scaling for precision and durability
In South Africa’s design studios and community workshops, the impulse to build is tempered by a bold truth: 3d printing what can you make scales with curiosity and care. Every filament choice becomes a lens on function, form, and future wear.
Materials, printers, and techniques must align to scale up something practical. From photopolymers and high-temperature thermoplastics to reinforced composites, the material genome dictates strength and finish. A capable printer with stable bed adhesion supports tight tolerances, while controlled processes—annealing, post-curing, and measured cooling—bolster durability and repeatability.
- Calibration for tight tolerances
- Material compatibility with post-processing
When scaling for precision and durability, think in systems and flow—the goal is turning ideas into reliable tools and fixtures that endure routine use.
Design, prototyping, and manufacturing workflows
From idea to CAD to print: a streamlined workflow
Design drives the rest of the workflow. In SA’s maker spaces, a clean design brief can shave days from production. From idea to CAD to print: a streamlined workflow makes that possible! Start with clear tolerances, materials, and assembly constraints, then translate ideas into CAD with a focus on manufacturability. In short, 3d printing what can you make starts with clear design intent.
Prototyping turns concepts into tangible tests. Quick iteration reveals fit, function, and user experience earlier than any tool. Keep a digital backup of each variant and link tests to design decisions.
- Test fit and function early
- Adjust geometry in CAD for printability
- Plan post-processing for final finish
Manufacturing workflows scale prototypes toward production. Standardize file naming, BOMs, and material choices to reduce waste and miscommunication. In South Africa, align with local suppliers, calibrate specs for moisture-prone climates, and build quality checks into the workflow to ensure consistent parts.
Rapid prototyping for product development
In South Africa, startups report halving iteration times with rapid prototyping. Rapid prototyping reshapes product storytelling in South Africa—where small teams turn sketches into testable parts in days, not weeks. In SA’s maker culture, the right design brief acts like a compass, guiding tolerances, materials, and assembly constraints toward manufacturability.
- Test fit and function early
- Adjust geometry in CAD for printability
- Plan post-processing for final finish
Manufacturing workflows scale prototypes toward production. Standardize file naming, BOMs, and material choices to reduce waste and miscommunication. In South Africa, align with local suppliers, calibrate specs for moisture-prone climates, and build quality checks into the workflow to ensure consistent parts. This is where 3d printing what can you make enters as a practical question guiding design toward real-world parts. The journey rewards curiosity and craft in equal measure.
Iterative testing and validation strategies
South Africa’s design rooms pulse with stubborn optimism: a sketch becomes a testable idea in days, not weeks, as startups halve iteration times through rapid prototyping. The design brief acts like a compass, guiding tolerances, materials, and assembly toward manufacturability.
Iterative testing and validation shape the manufacturing workflow, listening for fit and function as the object speaks—cracking, warping, or flexing—before costly rework accrues. The culture rewards curiosity and craft, aligning with moisture-prone climates and local suppliers to keep tests honest.
This is where 3d printing what can you make takes on concrete meaning.
Production considerations: multiple printers and outsourcing
In design rooms from Cape Town to Johannesburg, a rough sketch becomes a testable idea in a single afternoon. Design, prototyping, and manufacturing workflows braid together as teams push concepts toward manufacturability. 3d printing what can you make becomes a guiding anthem, turning imagination into prototypes that endure fit, finish, and the moisture-prone climate.
- In-house fleets of printers support rapid iterations and quick validation
- Outsourcing unlocks scale, access to specialized materials, and end-use parts
- Quality gates and post-processing workflows protect tolerances and surface finishes
- Local SA supplier networks reduce lead times and keep testing honest
In that balance of speed and craft, production considerations—multiple printers in rotation and selective outsourcing—keep ideas moving without sacrificing integrity. The design brief remains a compass, guiding tolerances, materials, and assembly toward durable, manufacturable outcomes.
Intellectual property and design rights basics
Speed is the new proof— “3d printing what can you make” isn’t a slogan, it’s a workflow. When design, prototyping, and manufacturing collide, ideas become testable in hours, not weeks. In South Africa’s design rooms, this loop forces early thinking about who owns what and how to move from concept to factory-ready parts without landing in legal quicksand.
Intellectual property basics to lock in early:
- Copyright protects the expression of a design, not the idea itself.
- Design rights guard the surface look—the aesthetic you can see and feel in a print.
- Patents cover novel functionality or methods; enforceable domestically and for export markets.
- Licensing choices: open-source sharing versus closed, revenue-driven models.
Pair these with versioning, clear handoffs, and supplier agreements, and the 3d printing what can you make question stays exciting—while remaining safe, scalable, and respectful of the rights that govern creation.
Safety, maintenance, and optimization
Workplace safety and material handling
Safety first drives every print. 3d printing what can you make depends on how you manage heat, fumes and sharp tools. In any SA workshop, PPE, proper ventilation and guard rails aren’t luxuries—they’re the baseline.
Maintenance matters more than you think: clean nozzles, level beds, and store materials correctly to improve reliability and finish. Regular calibration reduces failed prints and waste, a practical form of optimization that keeps workflows slick.
- PPE discipline and material storage
- Routine calibration as a quality ethos
- Ventilation and extraction as a safety backbone
Think of the workplace as a controlled lab: organized storage, spill kits, and training reduce risk and boost throughput. When you pair safety with disciplined maintenance, optimization becomes a routine, not a surprise.
Printer maintenance and calibration routines
In a sunlit SA workshop, discipline is the quiet catalyst of craft. 3d printing what can you make reveals itself when heat stays tame, fumes stay managed, and sharp tools stay sheathed. The baseline includes PPE and guarded work zones—invitation, not imposition.
Maintenance matters more than it seems: clean the nozzle, keep the bed level, and store materials as if guarding treasure. Regular checks keep prints reliable and waste down, turning optimization into a habit.
- Run a quick alignment check after setup and verify extrusion paths for consistency
- Reassess bed adhesion and start-up temperatures to prevent curl and warping
- Ensure waste, solvents, and resins are stored according to safety guidelines
When contemplating 3d printing what can you make, the path widens as calibration becomes routine and maintenance you trust. In this controlled lab of a workshop, optimization is both art and procedure, greeting every print with confidence.
Print quality optimization tips and common troubleshooting
South Africa’s makerspaces report prototypes landing 60% faster with desktop 3d printing, a punchy statistic that redefines possibility. 3d printing what can you make comes into focus when safety and maintenance stay calm, heat stays tame, and ambition finds a clean path to form.
Safety remains the quiet backbone: PPE, guarded zones, and clear ventilation. When people feel protected, calibration becomes precise and prints stay predictable, not dramatic misfires in the middle of a long run.
Maintenance is part of the craft. Run a quick alignment check after setup, reassess bed adhesion, and verify extrusion paths for consistency.
- Verify nozzle cleanliness and bed level
- Check extrusion flow and retraction settings
- Store materials and solvents safely
For print quality optimization, small tweaks to temperature, cooling, and speed yield big gains; troubleshooting common issues like curl or stringing requires patient, measured adjustments.
Environment, noise, and ventilation considerations
Push the envelope with 3d printing what can you make—it’s not just gadgets, it’s velocity. In South Africa, prototypes land 60% faster with desktop printers, turning bold ideas into tangible timelines.
Safety remains the quiet backbone: PPE, guarded zones, and clear ventilation. When people feel protected, calibration stays precise and prints stay predictable, not dramatic misfires in the middle of a long run—noise stays reasonable too.
- PPE and protective gear
- Guarded printer zones
- Effective ventilation
- Clear emergency procedures
Maintenance is part of the craft. After setup, run a quick alignment check, reassess bed adhesion, and verify extrusion paths for consistency.
- Verify nozzle cleanliness and bed level
- Check extrusion flow and retraction settings
- Run a quick alignment check after setup
- Store materials and solvents safely
Small tweaks to temperature, cooling, and speed yield big gains for print quality. With calm environments, 3d printing what can you make becomes reliably impressive across projects.

0 Comments